December 6, 2018~
Holiday Party Potholder Swap


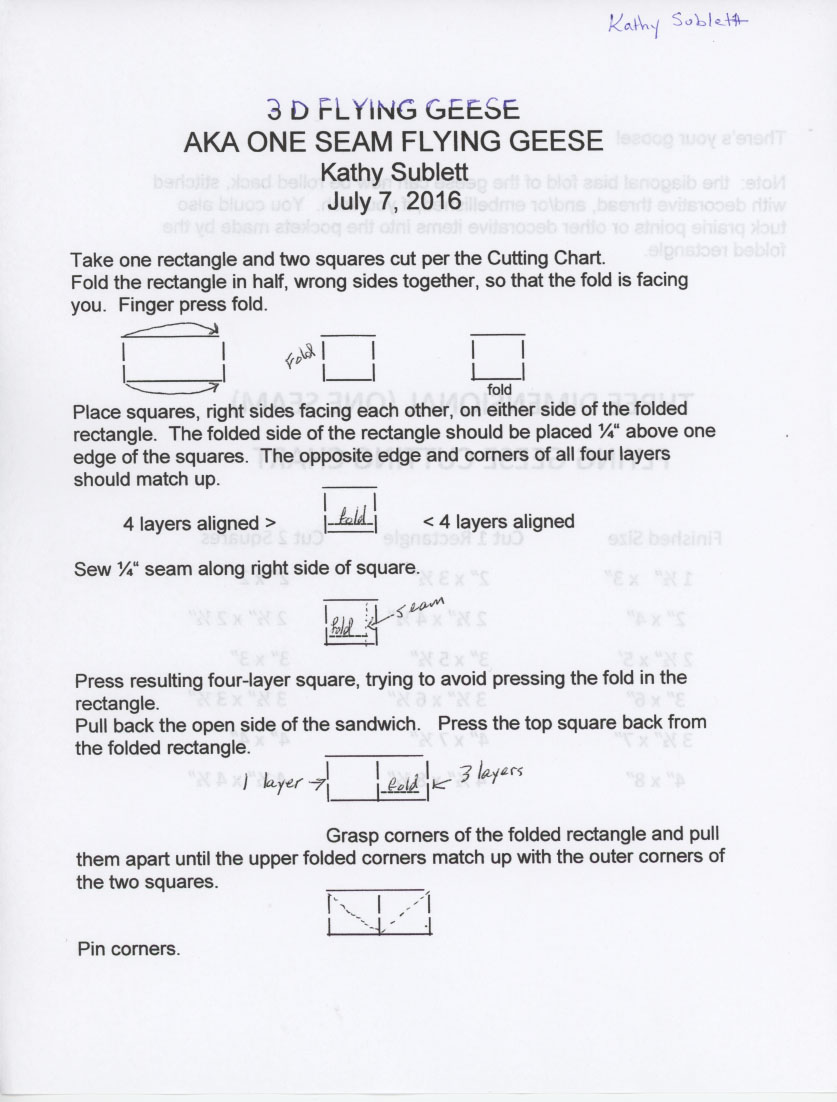
Benee K presented an interesting method for making Flying Geese until from squares. July 5, 2018

Learning about options for making donations for the Fiber Arts Fiesta Giving Tree - June 21, 2018


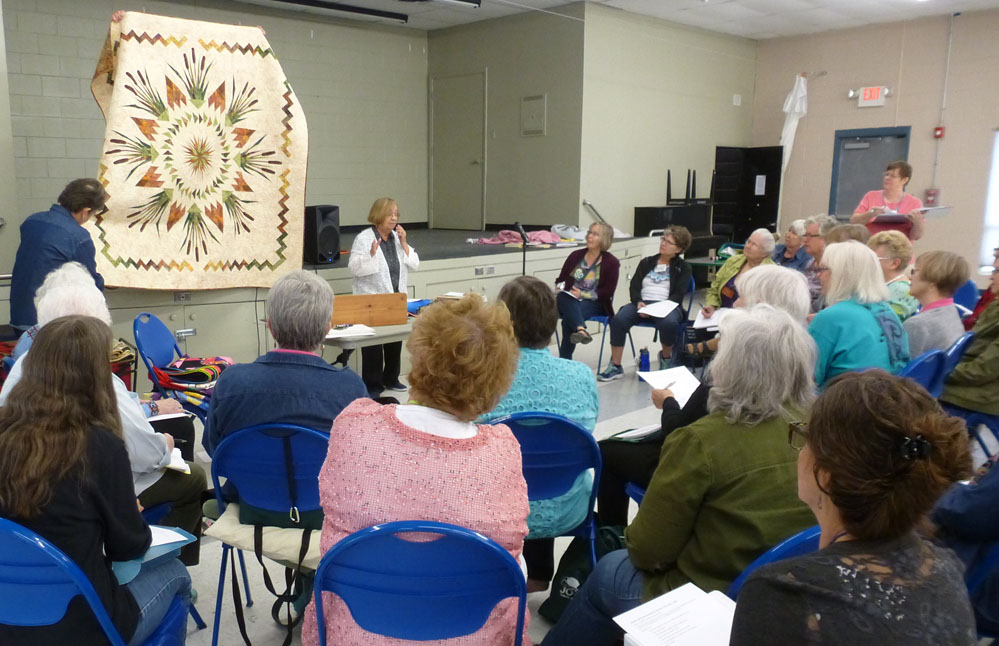
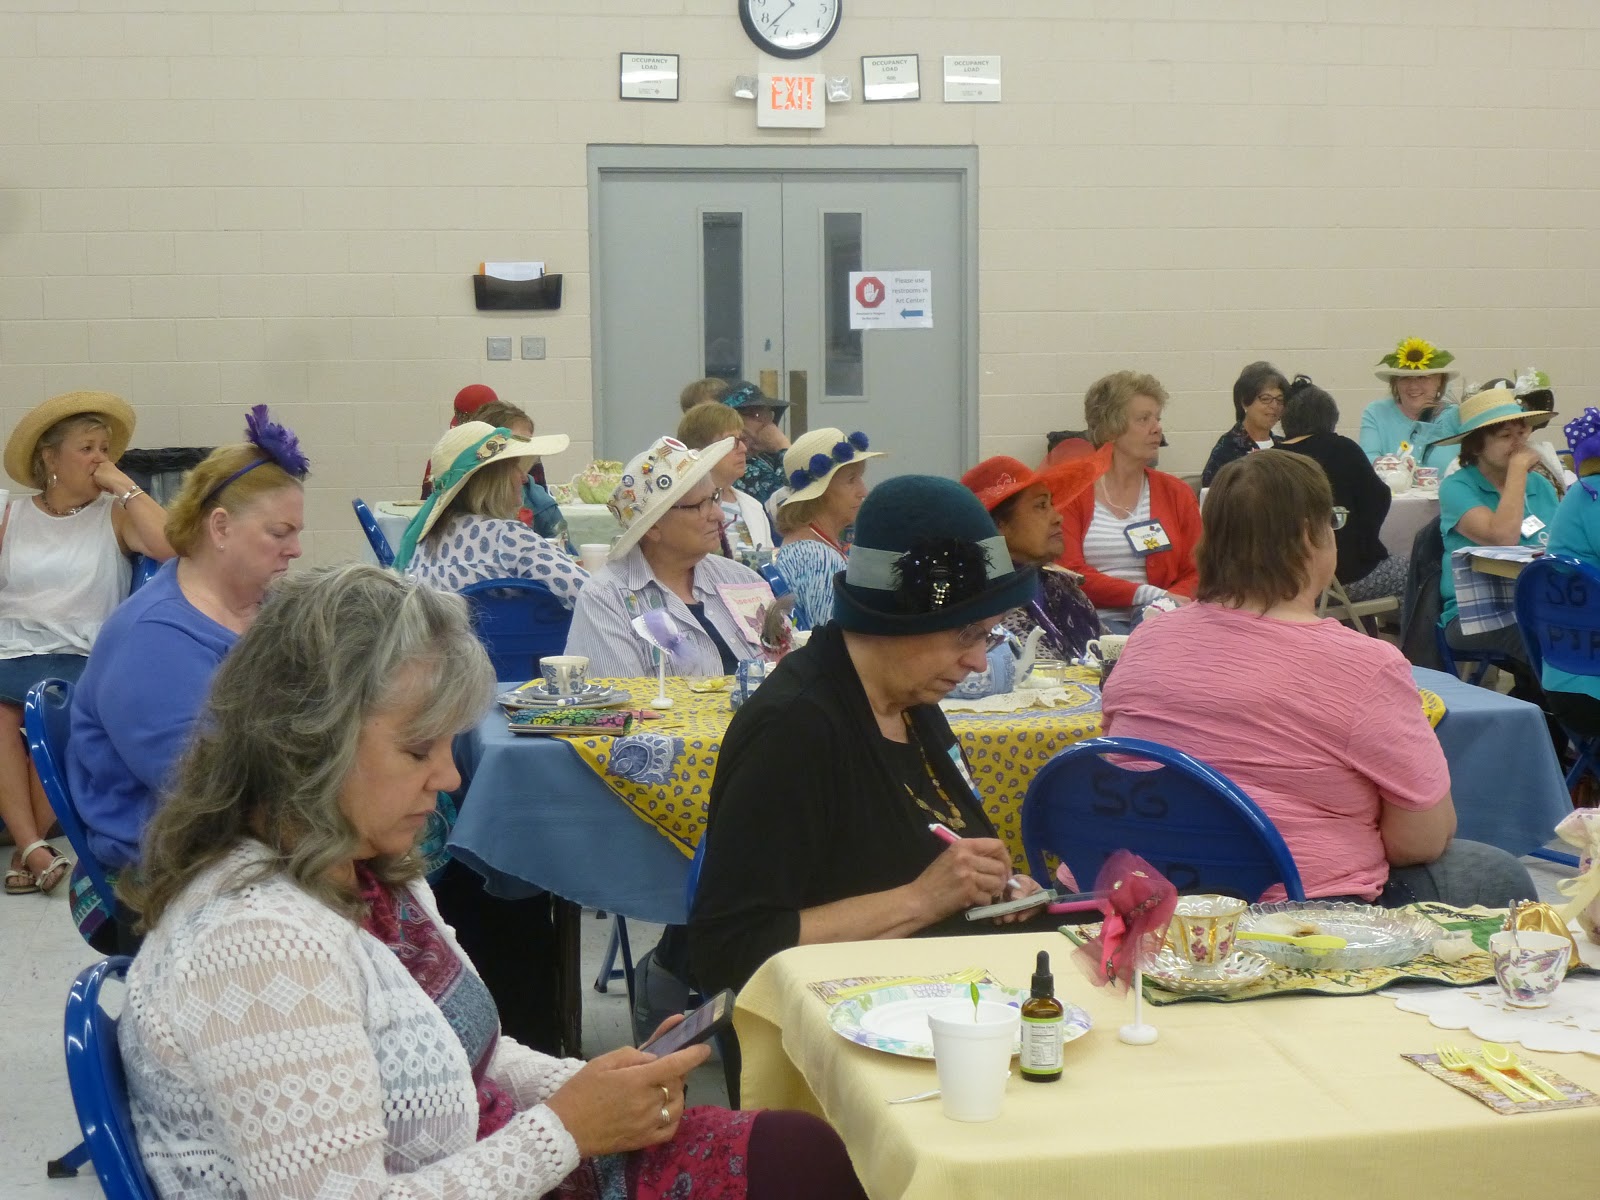
Tea Party Time May 17, 2018


Spring Retreat Early finishers May 3, 2018


Barbara G gave us a lovely trunk show and tips on working with borders to enhance your quilt tops. May 3, 2018


Spring Retreat Part 1 - April 19, 2018
Linda K presented the Easy Square in a Square Quilt while some members chose to work on their own projects.


Fleece Hats Charity Project
After the meeting on February 1, SJ and Eileen showed members how to make easy and fun fleece hats and/or scarves. Make one for yourself and/or others. You are encouraged to donate hats to Thimbleweed's hat collection project. The hats will be given to St Martin's Hospitality House (homeless shelter for families) and the pediatric cancer unit at UNM. Feel free to make them at home and bring to meetings. The fleece hat collection will be ongoing during the winter season. Directions to make 2 varieties (with modifications) are given below. You may create yet another modification . . . fun! If you have any questions, contact Eileen at 281-908-4384.
FLEECE HATS Eileen M and SJ Sanchez
HOW TO CUT
Using the chart below as a reference, cut fleece at home OR at the sew-in. IMPORTANT: If cutting fleece at home the circumference of the head (largest measurement) is to be cut on the the width of fabric (WOF) which is stretchy NOT the length of fabric
CUTTING MEASUREMENTS for ONE SIZE FITS ALL USING FLEECE
Adult: 23" X 14” (for tassel, add approx. 2" or longer).
Child : 20" X 10 “(for tassel add approx. 2" or longer)
Toddler: 19" X 10" (for tassel add approx. 2" or longer)
Infant: 14” x 7.5” (for tassel add approx. 2”)
TO CUSTOMIZE
--Measure circumference of head + .5" for seam allowance
--Measure bottom of earlobe to crown. Add 2” for bottom hem. For tassel add approx 2" or longer.
DIRECTIONS for hat WITHOUT tassel:
1. With right sides together, sew approx. ¼ - .5 “ seam along the width (stretchy side) of piece of fleece forming a tube. Use long stitch length about 2.8 -3.0.
2. For finished edge around the bottom of hat, turn under about 2.5” to wrong side and clip or pin. For toddlers 2”; for infant 1.5”
3. Sew about along raw edge all around bottom of hat using ziz-zag stitch (for example, 4.5 wide and .3 long).
4. With wrong side facing. and lay flat. On raw sides, place a pin on each fold as a marker. Open and lay flat opposite direction (pins meeting at center). Again, pin on each fold as a marker.
5. Match pairs of adjacent pins at center and pin at the center. 4 folds will result.
6. Sew along raw edges of each fold from outside to center. Make sure all stitches sew up to center as not to leave a hole in the center.
7. Turn right-side out and the hat is ready to wear!
DIRECTIONS for hat WITH tassels. See measurements above adding additional fleece for tassels and follow above directions 1,2, and 3.
4. Turn tube right side out and lay flat. From raw edge at top of hat, measure down 2” (or the length you chose for tassel) and draw a line across hat with pencil or marker.
5. Starting at raw edge, cut strips about 1/4” apart down to drawn line.
6. At bottom of strips along drawn line, gently finger-pleat single layer of fleece and gather at the center.
7. Squeeze and tightly tie a knot with a .25” strip. Two sets of hands make it easier! Fluff tassel and your hat is ready to wear!
Soup and Conversation 2018
Our New Year began with a potluck featuring soups and sides.


******************************************
******************************************
Holiday Tea 2017
Thank you to each of these fabulous ladies for your part in coordinating activities and making Thimbleweed Quilters 2017 a great year!

Holly P - Thank you to all of you! I am feeling blessed and honored with this quilt gift from Benee and Thimbleweed Quilters. I appreciate being wrapped in friendship. Hugs!

A Sweet Feast!

We do enjoy our treats and conversations.

Some frivolity with the White Elephant exchange.

***************************************************************************
7 steps to a Potato - Sewing and Potato Feast


******************************************************
September 21, 25th Birthday Party


**************************************************
August 17, 2017

********
Swap Meet

by Wendy Mathson
for Prayers
& Squares, The Prayer Quilt Ministry • www.PrayerQuilt.org © 2008 Cornerstone Graphics, Poway CA • WMathson@PrayerQuilt.org

Quilt finishes approx. 47"
x 60" with twelve 13½" pieced blocks and a 3" outer border. In the quilt pictured here, the same fabric is used for border and background.
I
named this “Swap Meet” because you can swap out any of the large squares with various pieced blocks. What
a great way to use scraps or to recycle an orphan block!
BONUS:
There are virtually
NO left-overs with this quilt. That
means after you cut up the strip sets to make all 12 blocks, you have almost nothing left over. YEAH – no scraps to deal
with when you are done! Word to the wise: just cut carefully.
NOTE:
I wrote this pattern after seeing a photo of a similar quilt, not knowing who designed it. My students
showed me the BQ
Quilt pattern by Debbie Bowles and I’m sure that’s where the design originated. BQ is slightly
different, and Debbie’s pattern includes multiple
sizes. There’s a BQ2 pat-tern
as well. Debbie's website is www.mapleislandquilts.com
for Prayers & Squares, The Prayer Quilt Ministry • www.PrayerQuilt.org © 2008 Cornerstone Graphics, Poway CA • WMathson@PrayerQuilt.org
Quilt finishes approx. 47" x 60" with twelve 13½" pieced blocks and a 3" outer border. In the quilt pictured here, the same fabric is used for border and background.
I named this “Swap Meet” because you can swap out any of the large squares with various pieced blocks. What a great way to use scraps or to recycle an orphan block!
BONUS: There are virtually NO left-overs with this quilt. That means after you cut up the strip sets to make all 12 blocks, you have almost nothing left over. YEAH – no scraps to deal with when you are done! Word to the wise: just cut carefully.
NOTE: I wrote this pattern after seeing a photo of a similar quilt, not knowing who designed it. My students showed me the BQ Quilt pattern by Debbie Bowles and I’m sure that’s where the design originated. BQ is slightly different, and Debbie’s pattern includes multiple sizes. There’s a BQ2 pat-tern as well. Debbie's website is www.mapleislandquilts.com

Notebook Finishers!
From Faye's class (instructions listed directly below)


August 3, 2017
Faye H presents - Notebook covers


Supply List for Notebook Cover:

Supply List for Notebook Cover:
1. Sewing machine, thread, scissors, rotary cutter, cutting mat and ruler
2. Composition note book. *(Fay will provide)
3. Monthly planner (calendar) approximately same size as composition book.
*(Fay will provide.)
4. 14"X WOF quilted fabric (purchased) or your own quilted fabric.
5. Two packages of extra wide double fold bias tape to match your fabric.
6. 2" of Velcro. *(Fay will provide.)
*Please note the starred items are things Fay will provide. Fay will need an accurate count so I will be able to make the purchases. Once you learn how to make this you can make it any size you want. Using the directions Fay will supply you can make the adjustments to fit your needs. Happy Sewing, Faye!!
Here is what to prepare: 'Homework for Quilted Notebook Cover'
From your quilted fabric
1. Measure and cut two (2) 12" X 22" rectangles from your fabric
2. Preserve one of the 12 X 22 inch rectangles. Using the other 12"x22" piece - sub cut the following 3 pieces:
a. Cut 1- 6"x12" rectangle,
b. cut 1- 3"x 12" rectangle
c. cut 1- 4"x 6" remove the batting from this piece or if you make your own quilted fabric, leave a piece this size unquilted
There will be some fabric left over.
*******
Instructions
for Quilted Notebook Cover
You
can use a fancy stitch for this part if you want: Sew
double wide bias tape to one (long) side of the 6"x12" rectangle and Sew
double wide bias tape to both (long) sides of the 3"x12"
rectangle.


Lay
the two 4"x6" pieces right sides together with a pieces of interfacing on wrong side of fabric that will be showing; sew 1/4"
seam leaving a 2" opening. Trim corners and turn right side out.
Press and stitch 2" opening closed.(this will now be called a
pocket)


Take
the 6"x12" rectangle and the pocket, center the pocket and
measure 2" up from bottom of the rectangle.*
Sew
along the three sides a scant 1/4" seam, measure and mark the
center of pocket and stitch down center. You will have two slots for
your pen and pencil.
*
the finished edge (bias tape) must be on the right side as you are
looking at it.

To
make the rounded edge take the 12"x22" rectangle and place
the pattern on the coordinating (inside) fabric. Place as close to
the edge as you can and cut the excess fabric away. CUT ONLY ONE END. You may use the template provided or curve your corners in any size desired.


Use
the notebook as a guide and fold the fabric over your book lining the
fabric and book so that the edges meet, now bring the rounded edge
over the top. Mark with pins where they join and open cover.


Velcro
placement:
Measure
1 1/2"from center of rounded edge and place the hook side of
velcro. Sew in place. Place the loop side of the velcro on to other
side where you marked with pin. Check to make sure it is positioned
correctly before you stitch and make adjustments as needed.**
**
You MUST put the velcro on outside of note book before you continue
with next step.
Assembly
for Cover
With
the wrong side (inside) facing up take the 6"x22" piece
(with the pocket) to the left with the edges even. Pin in place.
Take
the 3"x12" piece that has the bias tape on both edges and
place 6" from the pocket piece. Pin in place.
Test
the placement of the strips to make sure the provided notebook and
calender fit and the cover closes neatly.


Now
you are almost finished with your notebook cover.
Once
you have made any adjustments and the books fit to your liking baste
around the edges. Remove pins.
Sew
the double wide bias tape around the outer edge of the cover.
Enjoy!!!!
You are done.


*********************************************************
July 20, 2017
Benee K presents “Hot Britches” Potholders
Sign up with Benee at the July 20 meeting.

Supply List for Hot Britches Potholder Project
Other Supplies – squares of template plastic or sturdy cardboard (not too thick) to make templates
Patterns and instructions supplied day of project.
***********************************************************************
Benee K presents “Hot Britches” Potholders
Sign up with Benee at the July 20 meeting.

Supply List for Hot Britches Potholder Project
3 coordinating fabric squares (10” or 12” or 14”)
Note: the pattern calls for 10” squares, but the end result is small (more decorative than functional for potholders, so you can use larger squares for larger end result; I will provide patterns for all three sizes)
Squares of batting to cut for lining
Squares of Insul-brite if you are going to use them as pot holders
2 small to medium buttons
Optional: Narrow 7” ribbon for strap – I made a strap from my fabric, but ribbon is a nice touch
Other Supplies – squares of template plastic or sturdy cardboard (not too thick) to make templates
Hand sewing needles
Sewing machine, preferably with walking foot
Pins
Coordinating Thread
Scissors – paper and fabric
Other ‘usual’ sewing supplies
Patterns and instructions supplied day of project.
***********************************************************************
***********************************************************************
June 15 - Easy Zipper bag
presented by Faye H.


****************************************************************************
June 1, 2017 Candle Wreath presented by Kennie W.

*************************************************************************
May 18, 2017 - Tea Party:
Miniature Hat place markers, Fancy Hat Contest,
and Sewing Basket Auction!
Miniature Hats as place markers. Thank you Jeanne H and hubby for loaning us the great mini hat stands.


Hat contest judge - Suzanne Kelly, owner of Hip Stitch Fabrics

Winning Hat

Hat contest winner - Linda H

Sewing Basket Raffle was a fun success

AAA Storage running the auction - Anna Mae, Ann K, and Ann D


Guests, Hats, and Friends


April 20, 2017
Spring Retreat day one


April 6, 2017
Jeanne H with her piles of 1 7/8 inch square for the "Puppy Class" - Patchwork using grid-style fusible interfacing.


******************************************************
March 2, 2017
Anna Mae F presented a class on making and embellishing a woven placemat into a craft carrier.

*********************************************************************************
December 1st, 2016 - the "It's not a Holiday Party" Day
On our last meeting of the year we had a beautifully decorated space thanks to the Sabana Grande folks. Thank you for letting us use your pretty space. We held our "not a holiday party" party with a cookie exchange and other food offerings. There were games and drawings and much merriment.


********************************************
Fun at Fall Retreat at Hummingbird Music Camp
On the
weekend of September 23 – 25, Thimbleweeds Quilters of Rio Rancho, NM, held
their annual quilting retreat at rustic Hummingbird Music Camp located in the
beautiful, rugged Jemez Mountains about 60 miles north of Albuquerque. It was three days of fun, food, camaraderie,
and quilting with friends amidst spectacular autumn scenery.
There were
two very different classes taught by highly qualified instructors, plus plenty
of room for the more independent (or contrary) attendees to work on their many
UFO’s (Un-Finished Objects.)
The primary
themes of the retreat were quilting, fun, and chocolate, not necessarily in
that order.


September 15, 2016
Continuous Binding - presented by Diane B.
Diane taught how to make continuous bias binding. Binding cut on the bias is needed if your quilt or project has curved edges. Some quilters use bias
binding for all their quilts. (For those who have signed up for Night Owl at camp, we will be providing the binding tool and glove.)
Supply List
1. 2/3 yard of fabric that contrasts with your apron fabric
2. Thread to match fabric
3. Sewing machine and ¼ inch foot
4. Sewing supplies (pins etc.)
5. Fabric Scissors
6. 6X24 ruler
7. Rotary cutting supplies (if you haven’t done the prep)
8. Marking tool that will show up on your fabric---NOT one that will disappear when ironed! We will be
cutting on this line, so a permanent marker is ok.
9. Iron and ironing surface
10. Bias tape maker and heatproof glove (provided).
Prep
1. Cut a 23x23 inch square (you will have fabric left over).
2. Cut the square in half diagonally (one time only!). You will have 2 right triangles.
3. Place the triangles with right sides together orienting them as shown.


Sew the top seam at 1/4 inch (Thank you to Roseann for being our model)

Press the seam open

Mark the wrong side of your fabric all the way across in 2 inch increments from the edge as Diane is showing. Be sure to use a marking tool that will not disappear with ironing.

Match the lines, offsetting by one all across the two diagonal edges. Pin well. This will create a very warped seam to sew but go slowly around the seam and it will work.


Carefully sew the seam at 1/4 inch.


Gently press the seam open. Orient your fabric as show and slide your ruler inside the tube to protect the other side while cutting.

Cut your fabric on the marked lines. It will work in a spiral fashion so keep adjusting your ruler to protect the second layer.


You will have one long - Continuous - bias binding

Work one end of the binding into the bias tape maker tool. You may need a pin or stiletto to get it started.

Pull the fabric through and adjust the folds to meet the edges in the center


Wer you glove on the hand holding the binding, Press the binding as you slide the tool along the fabric strip.

When complete fold the binding in half again, meeting the folded edges and press. Your Double Fold Continuous Bias Binding is complete

For the Apron project - it is Bias as well. To lay out the pattern fold you one yard of fabric on the bias (into a half square triangle)

Place your pattern on the fold being sure to save the piece of fabric on the end for the apron ties.

The pocket piece is cut on the fold also - below the apron where Diane's hand is showing.

************************************************************
binding for all their quilts. (For those who have signed up for Night Owl at camp, we will be providing the binding tool and glove.)
Supply List
1. 2/3 yard of fabric that contrasts with your apron fabric
2. Thread to match fabric
3. Sewing machine and ¼ inch foot
4. Sewing supplies (pins etc.)
5. Fabric Scissors
6. 6X24 ruler
7. Rotary cutting supplies (if you haven’t done the prep)
8. Marking tool that will show up on your fabric---NOT one that will disappear when ironed! We will be
cutting on this line, so a permanent marker is ok.
9. Iron and ironing surface
10. Bias tape maker and heatproof glove (provided).
Prep
1. Cut a 23x23 inch square (you will have fabric left over).
2. Cut the square in half diagonally (one time only!). You will have 2 right triangles.
3. Place the triangles with right sides together orienting them as shown.


Sew the top seam at 1/4 inch (Thank you to Roseann for being our model)

Press the seam open

Mark the wrong side of your fabric all the way across in 2 inch increments from the edge as Diane is showing. Be sure to use a marking tool that will not disappear with ironing.

Match the lines, offsetting by one all across the two diagonal edges. Pin well. This will create a very warped seam to sew but go slowly around the seam and it will work.


Carefully sew the seam at 1/4 inch.


Gently press the seam open. Orient your fabric as show and slide your ruler inside the tube to protect the other side while cutting.

Cut your fabric on the marked lines. It will work in a spiral fashion so keep adjusting your ruler to protect the second layer.


You will have one long - Continuous - bias binding

Work one end of the binding into the bias tape maker tool. You may need a pin or stiletto to get it started.

Pull the fabric through and adjust the folds to meet the edges in the center


Wer you glove on the hand holding the binding, Press the binding as you slide the tool along the fabric strip.


For the Apron project - it is Bias as well. To lay out the pattern fold you one yard of fabric on the bias (into a half square triangle)

Place your pattern on the fold being sure to save the piece of fabric on the end for the apron ties.


************************************************************
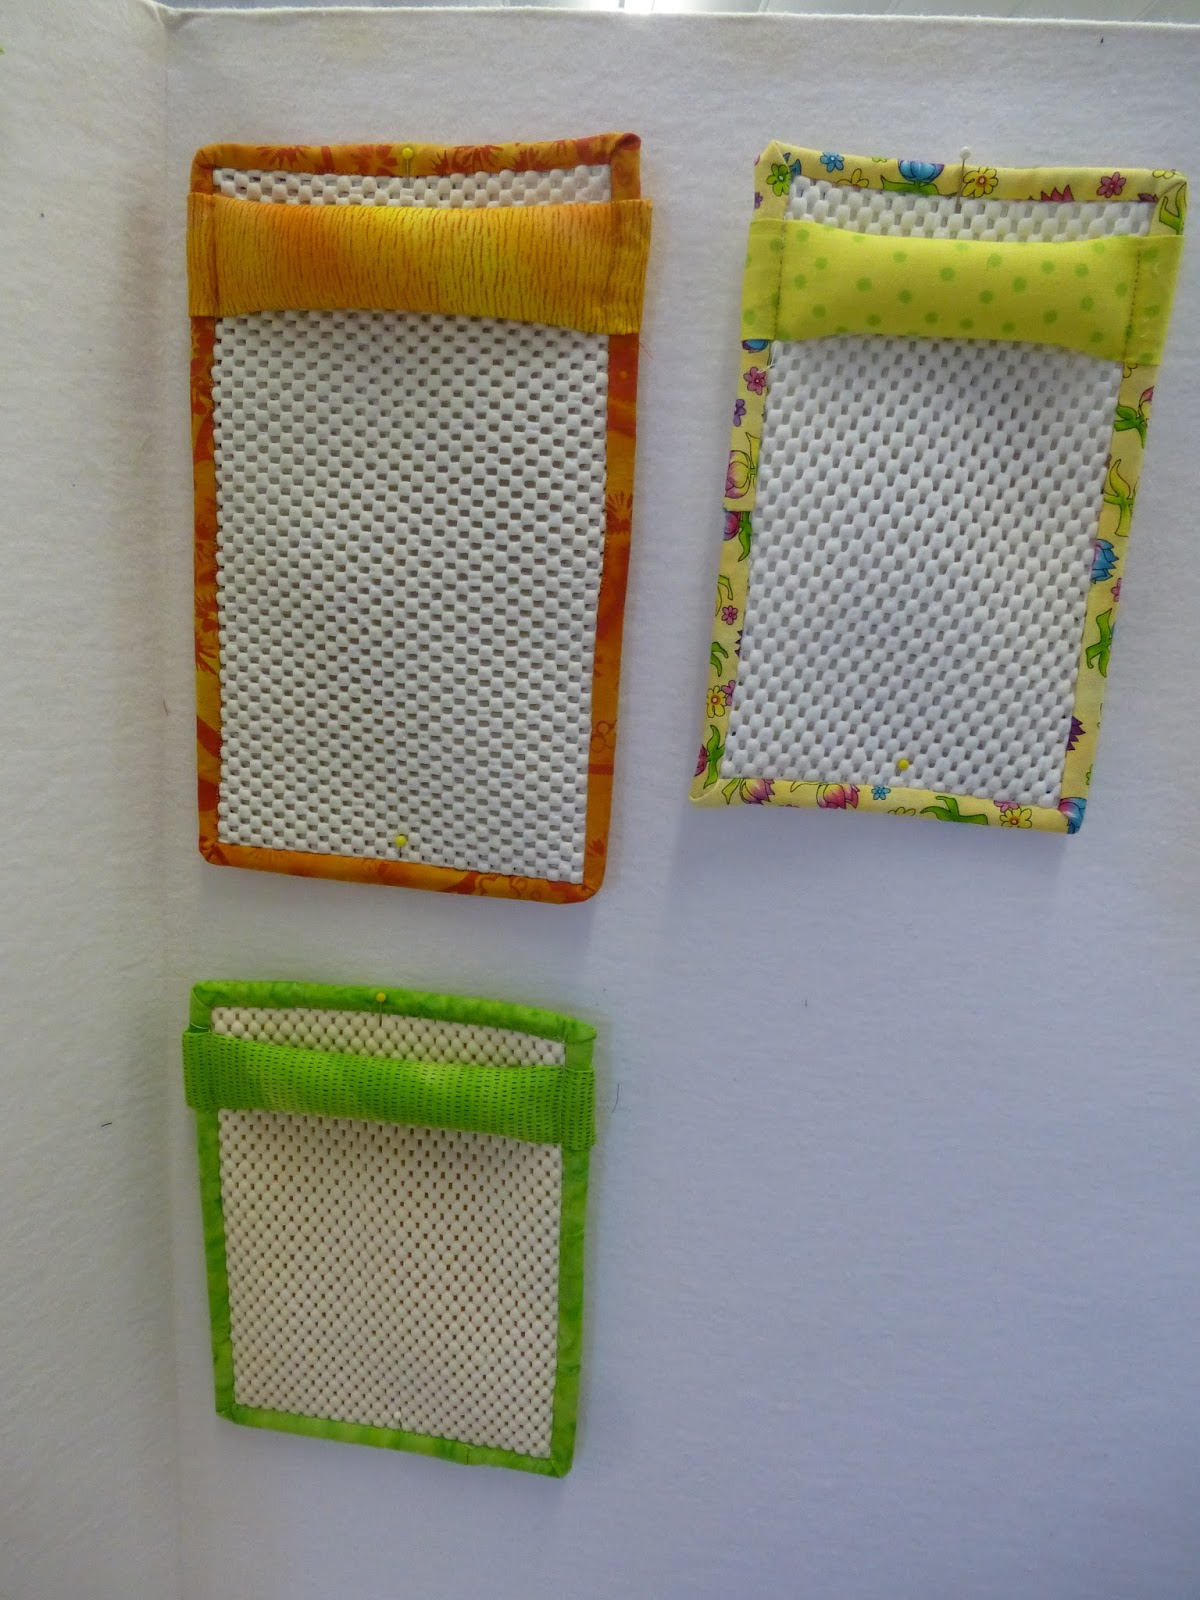
August 4, 2016
Community Service Day
On
August 4th, with the help of Kathy S. and Sue Harris, we had fun making some
ornaments/decorations for the giving tree (donors Gifts) for Albuquerque Fiber
Arts Fiesta 2017. Below are the instructions that were handed out in case you want to make more to bring in and add to our donation. We have agreed to make 200 items. Other completed items happily accepted as well. Ideas include: pillowcases, needle cases, small covered notebooks, aprons, hanging towels, pin cushions, small zippered bags, etc.

July 7th, 2016
Flying Geese 4 Ways - Demonstrations

Diane Bourg demonstrated a No Waste method

Kathy Sublett demonstrated a 3D or One Seam Method

Ardith A. demonstrated the Eleanor Burns Method


Thank you to our wonderful members for sharing these methods and helping us think about what our favorite might be and to try new ways!
May 5th, 2016
Debbie R. presents:
No slip pad for sewing machine foot pedal
Are you tired of chasing your foot pedal when you are sewing? This class is for you.
Bring these items to class:
Sewing machine with walking foot
Basic sewing supplies
Jean needle for sewing machine
Hand sewing needle
Small binding clips ( A Must)
1 2 1/2" WOF strip of fabric
1 10"x10" square (same color of strip or a coordinated color)
1 4"x5" piece of batting
$1.00 for extra supplies that I will provide.
Questions? Contact Debbie Roberts by phone or text 620-2797
Debbie's example board - All the pieces needed to make this. Brown is the rubber shelf liner. Long brown piece is the binding folded in half long-wise. Green is stopper pad unrolled. Orange and yellow are stopped pad complete.

To reduce bulk in the stopper pad and make it easier to sew to the bound rubber pieces -
Take a 2" by 4" notch out of each side bottom before rolling.

Finished samples in three sizes. Customize your own.
Thank you Debbie for a great presentation!
Spring Retreat
April 21st and 28th, 2016
9:30 - 2:00 two weeks in a row
Kristen and Pat will be teaching at the Spring Retreat. They have patterns that emphasize using up scraps and stash. The challenge is to do this without buying any additional fabric.
This is a great opportunity to use up some of that fabric that is an orphan. At the time you bought it, you thought it was really nice, but now you say, “What was I thinking?” Perhaps you have some fat quarters from games that were played, and you really don’t care for the pattern or color. The 2 ½” strips that you have lying around will be great for this, too. Since the individual pieces end up being fairly small, any ugly fabric you want to get rid of won’t really show up in the quilt!
Kristen has a wall-hanging and a table runner/placemat set, and Pat has two lap quilts that are related. (Parts from the first quilt will make up 2/3 of the second.) Both quilts can easily be made larger or smaller. Samples will be available for viewing at the April 7th meeting.
UFO sewers are very welcome at the Retreat!
For Kristen’s classes:


Table runner and 4 place mats
(table runner: 13 ½” x 48 ½”)
(place mat: 13 ½” x 18 ½”)
Cutting instructions for place mats and table runner
(Please keep Block A pieces and Block B pieces separate.)
Block A
From light fabrics: twenty 2 ½” X 3 ½” strips
From dark fabrics: forty 1 ½” x 4 ½” strips
forty 1 ½” x 7 ½” strips
Block B
From light fabrics: forty 1 ½” x 4 ½” strips
forty 1 ½” x 7 ½” strips
From dark fabrics: twenty 1 ½” x 3 ½’ strips
Blocks A & B
From medium fabrics: eighty 1 ½” x 2 ½” strips
(40 for Block A and 40 for Block B)
Eighty 1 ½” x 5 ½” strips
(40 for Block A and 40 for Block B)
Please cut all strips before class.
Wall hanging
(approx. 37 ½” x 37 ½”)
Cutting instructions
Block A
From light fabrics: sixteen 2 ½” x 3 ½” strips
From dark fabrics: twenty-nine 1 ½” x 4 ½” strips
twenty-nine 1 ½” x 7 ½” strips
Block B
From light fabrics: twenty-six 1 ½” x 4 ½” strips
twenty-six 1 ½” x 7 ½” strips
From dark fabrics: fifteen 2 ½” x 3 ½” strips
Blocks A & B
From medium fabrics: fifty-five 1 ½” x 2 ½” strips
(28 for Block A and 27 for Block B)
fifty-five 1 ½” x 5 ½” strips
(28 for Block A and 27 for Block B)
Center
From light fabrics: nine 7 ½” squares
Frame and Outer borders
From dark fabric: six 1/1/2” x 40” strips
Please do all cutting before class.
Pat's Quilts class


In order to make a quilt the size of the sample, you will need to make 70 blocks ( 7 blocks wide x 10 blocks long). This will make a quilt approximately 55” x 73”, including a 6 ½” border all around. You can make more or fewer blocks according to the size you want.
Quilt Two is made of parts of the rectangles used in Quilt One, plus some extra strip sets. The sample is approximately 53” x 68”, including a 6 ½” border all around. It can be adjusted in size also.
Cutting instructions for the quilts:
(As you cut, be sure to keep all pieces of the same size and color group together (Ziploc bags, maybe?) and label the size of the pieces.)
Cutting instructions for quilt 1 (to have leftovers for 2nd quilt)
You will be making 35 of Block A and 35 of Block B. Please keep pieces for Block A and Block B separate.
Block A
From light fabrics: thirty-five 2 ½” x 8 ½” strips
From dark fabrics: seventy 1 ½” x 4 ½” strips
seventy 1 ½” x 12 ½” strips
Block B
From light fabrics: seventy 1 ½” x 4 ½” strips
seventy 1 ½” x 12 ½” strips
From dark fabrics: thirty-five 2 ½” x 8 ½” strips
Blocks A & B
From medium fabrics: one hundred forty 1 ½” x 2 ½” strips
(70 for Block A and 70 for Block B)
One hundred forty 1 ½” x 10 ½” strips
(70 for Block A and 70 for Block B)
Please cut all strips before class.
Leftovers quilt (approx. 55” x 69”)
Cutting instructions for Leftovers quilt (assuming leftover pieces from quilt 1)
Construct strip sets with 5 different fabrics in each set. The quilt will be scrappier if the strip sets aren’t too long.
For each Block A strip set: 2 dark strips 1 ½” wide
2 medium strips 1 ½” wide
1 light strip 2 ½” wide
From the strip sets, you will need to be able to cut a total of twenty-eight 2 ½” wide pieces.
For each Block B strip set: 2 light strips 1 ½” wide
2 medium strips 1 ½” wide
1 dark strip 2 ½” wide
From the strip sets, you will need to be able to cut a total of twenty-eight 2 ½” wide pieces.
Cutting instructions for Leftovers quilt (assuming no leftovers from quilt 1)
Construct strip sets with 5 different fabrics in each set. The quilt will be scrappier if the strip sets aren’t too long.
For each Block A strip set: 2 dark strips 1 ½” wide
2 medium strips 1 ½” wide
1 light strip 2 ½” wide
From the strip sets, you will need to be able to cut a total of ninety-eight 2 ½” wide pieces.
For each Block B strip set: 2 light strips 1 ½” wide
2 medium strips 1 ½” wide
1 dark strip 2 ½” wide
From the strip sets, you will need to be able to cut a total of ninety-eight 2 ½” wide pieces
You need to bring your sewing machine with the usual notions, cutting mat, ruler, and rotary cutter. If you would like to bring an iron to share with those at your table, that would be fine.
**********************************************************************************
**********************************************************************************
April 7, 2016 - Ruler Case
presented by Judy G.
This is a simple quilt envelope and an excellent opportunity to use your stash.
Supplies: 1) Quilt sandwich twice the width of you ruler by the length of the ruler plus one inch to each side for seam allowances. 2) Binding of your favorite width that is 3 times the width by length. Add enough for a hanging loop. 3) For a shoulder strap you will need 1 yard of 3 inch wide fabric to be folded and stitched to strap width, or purchase heavy ribbon or strapping. (This can be added to a completed case later as well.) 4) Accessorize: With a pocket for a rotary cutter. You will need a quilt sandwich approx 7 inches by 10 inches in length plus binding for the top edge. Please bring your sewing machine, regular sewing supplies, and a walking foot to apply the binding.
Update:
Judy gave a great presentation and had a display board showing the construction steps. Here are photos of that board. Hopefully that will help you if you want to make this again or couldn't attend.


Iron Caddy and pad presented by Faye H.
The 2nd meeting in February (February 18) we will be making a sweet iron tote and ironing pad all in one!!! This will be a class where you can make a regular sized tote or a small one for your travel iron.(Small pattern has been adapted from large pattern) I will have the sign up sheet available at the 1st February meeting.
Materials needed for large tote:
- 21”x 28” Main Fabric
- (2) 4”x 14” strips for handles
- (2) 21” x 28” cotton batting*
- contrast fabric to make 90” binding (about 1/4 yd)
- (2) 1” pretty buttons (shank buttons work well)
Materials needed for small tote:
- 16”x 21” Main Fabric
- (2) 4”x 10” strips for handle
- (2) 16”x 21” cotton batting*
- contrast fabric to make 70” binding (about 21/2” strips WOF)
- (2) 1” pretty buttons (shank buttons work well)
The heat resistant fabric will be provided for you as well as the elastic needed to complete your tote.
Please note the*
*You may choose to use 2 layers of cotton batting or one layer of insulbrite and one layer of cotton batting or 2 layers of insulbrite. This is up to you. There is also Thinsolate that may be used in place of the batting. I have not had any experience with this but perhaps someone else has.
I hope many of you will enjoy and join this class that I have prepared for you. Thank you, Faye H. ****** Also please remember to bring: 1. sewing machine, 2.walking foot, 3.cutting mat, ruler and rotary cutter, 4.scissors for paper and fabric, also normal sewing supplies.
Machine binding tips and tricks, January 21, 2016 — Diane Bourg
We will be binding two placemats by machine, and I will show you some tips for making the start/end of your binding “invisible” and for reducing bulk at the corners.
For this class you will need:
1. Four strips, 2 ½” wide by WOF for binding
2. Two pieces of fabric 17 ½” by 13 ½” for the tops
3. Two pieces of batting (same size as top)
4. Two pieces of fabric (same size as top) for the back
Put the 3 layers together and quilt the placemats before class, but do NOT piece the binding.
OR
Four strips of binding fabric and two pieces of double-faced, pre-quilted fabric 17 ½” by13 1/2”
You will also need your sewing machine and walking foot, marking pen or pencil that shows up on your binding, 6 inch ruler, seam ripper, fabric scissors, and the usual sewing supplies. Use thread that matches the binding.
D
May 7, 2015 Class by Judy A.
Supply List
YOU WILL NEED
FOR THE TOP (outside)
6 fat quarters YOU WILL NOT BE USING THE FULL FAT QUARTER – from each fat quarter (doesn’t have to be a fat quarter either) cut one rectangle 17 ½ x 19 1/2 inches YOU WILL NEED 6 (when you sew them together you should have a piece of fabric 38 ½ x 51 ½ " )
OR
ONE SOLID or PIECED OF ANY FABRIC (you can also use a ufo, do diagonal strips, make a scrappy patchwork – anything you want as long as it is the same size as your lining- 38 ½ x51 ½
- if you are going to use directional fabric you will need to cut it in half – turn one side upside down and sew back together - cut it wide enough to allow for the extra seam ( if you are using a half inch seam you will need to add 1" so your fabric will start out 39 ½ x 51 ½ " ).
FOR THE LINING
A PIECE OF FABRIC 38 ½ x 51 ½" (THERE IS NO BATTING)
PLEASE CUT/SEW YOUR TOP AND CUT OUT YOUR LINING BEFORE CLASS
FOR THE HANDLES – you will be making two handles - ~ 1" WIDE x 40 - 72" LONG.
1/3 yd. Coordinating fabric
thin batting or flannel for handles – aprox 2” wide and desired length
22" of 1" wide non-roll elastic cut into two 11” pieces
Couple of BIG safety pins ( I WILL SUPPLY THE ELASTIC AND PINS)
http://www.favequilts.com/Bags-Purses-Totes/Fat-Quarter-Drawstring-Bag-from-Martingale
http://www.favequilts.com/Bags-Purses-Totes/Fat-Quarter-Drawstring-Bag-from-Martingale
WE WILL BE MAKING THE HANDLES IN CLASS
HANDLES - This pattern calls for cutting 2 2 ½ " x 40" of fabric and one of batt or flannel sandwiching and sewing down both sides – this requires turning – if you want to do it this way you will need a turning tool.
ALTERNATE METHOD - cut 2 strips 4x as wide as you want your finished handle - I use 5" and as long as you want your handle (44" is good )
Cut your batt or flannel TWICE the finished width ( ~ two inches) x desired length
FOLD YOUR FABRIC IN HALF LENGTHWISE AND THEN FOLD EACH SIDE TOWARDS THE CENTER – PRESS – OPEN (you will have four sections) PLACE YOUR BATTING IN THE CENTER (over the middle two sections) – FOLD THE TWO SIDES IN AND FOLD IN HALF. You should have no raw edges and a handle about 1" wide – SEW THE OPEN SIDE WITH A STRAIGHT OR ZIG ZAG STITCH (can sew both sides for esthetics or use decorative stitches – whatever you like)
YOU WILL ALSO NEED
Your sewing machine with accessories and coordinating thread (throw in your zipper and walking foot)
Sewing scissors
A ruler
A fabric marker – if you don’t have one – don’t buy one – we will be marking two lines – you can borrow or use a piece of masking tape
A rotary cutter and mat to cut the handles (you can certainly use a pair of scissors instead )
An iron – I will be setting up the thimbleweeds irons but some like to bring their own
pins
April 2, 2015 Class by Holly P.
Sign up for the extras bag - $5 for everything but the fabric, batting and needles!
Hand Sewing Caddy

Size when closed 4 1/2 x 3 inches

Spring Retreat 2015 - April 16 and 23
Sabana Grande Community Center, Rio Rancho
Projects offered:
Chili Pepper table runner

Play with your decorative stitches

OR
"Anita's Arrowhead"


Pattern available online:

May 15 2015 Tic Tac Toe Quilt - Andra Ridout

December 4, 2014
Christmas Party
Gathering before the meeting


Adorable Doll Bed Silent Auction

Bingo! with Barb S.


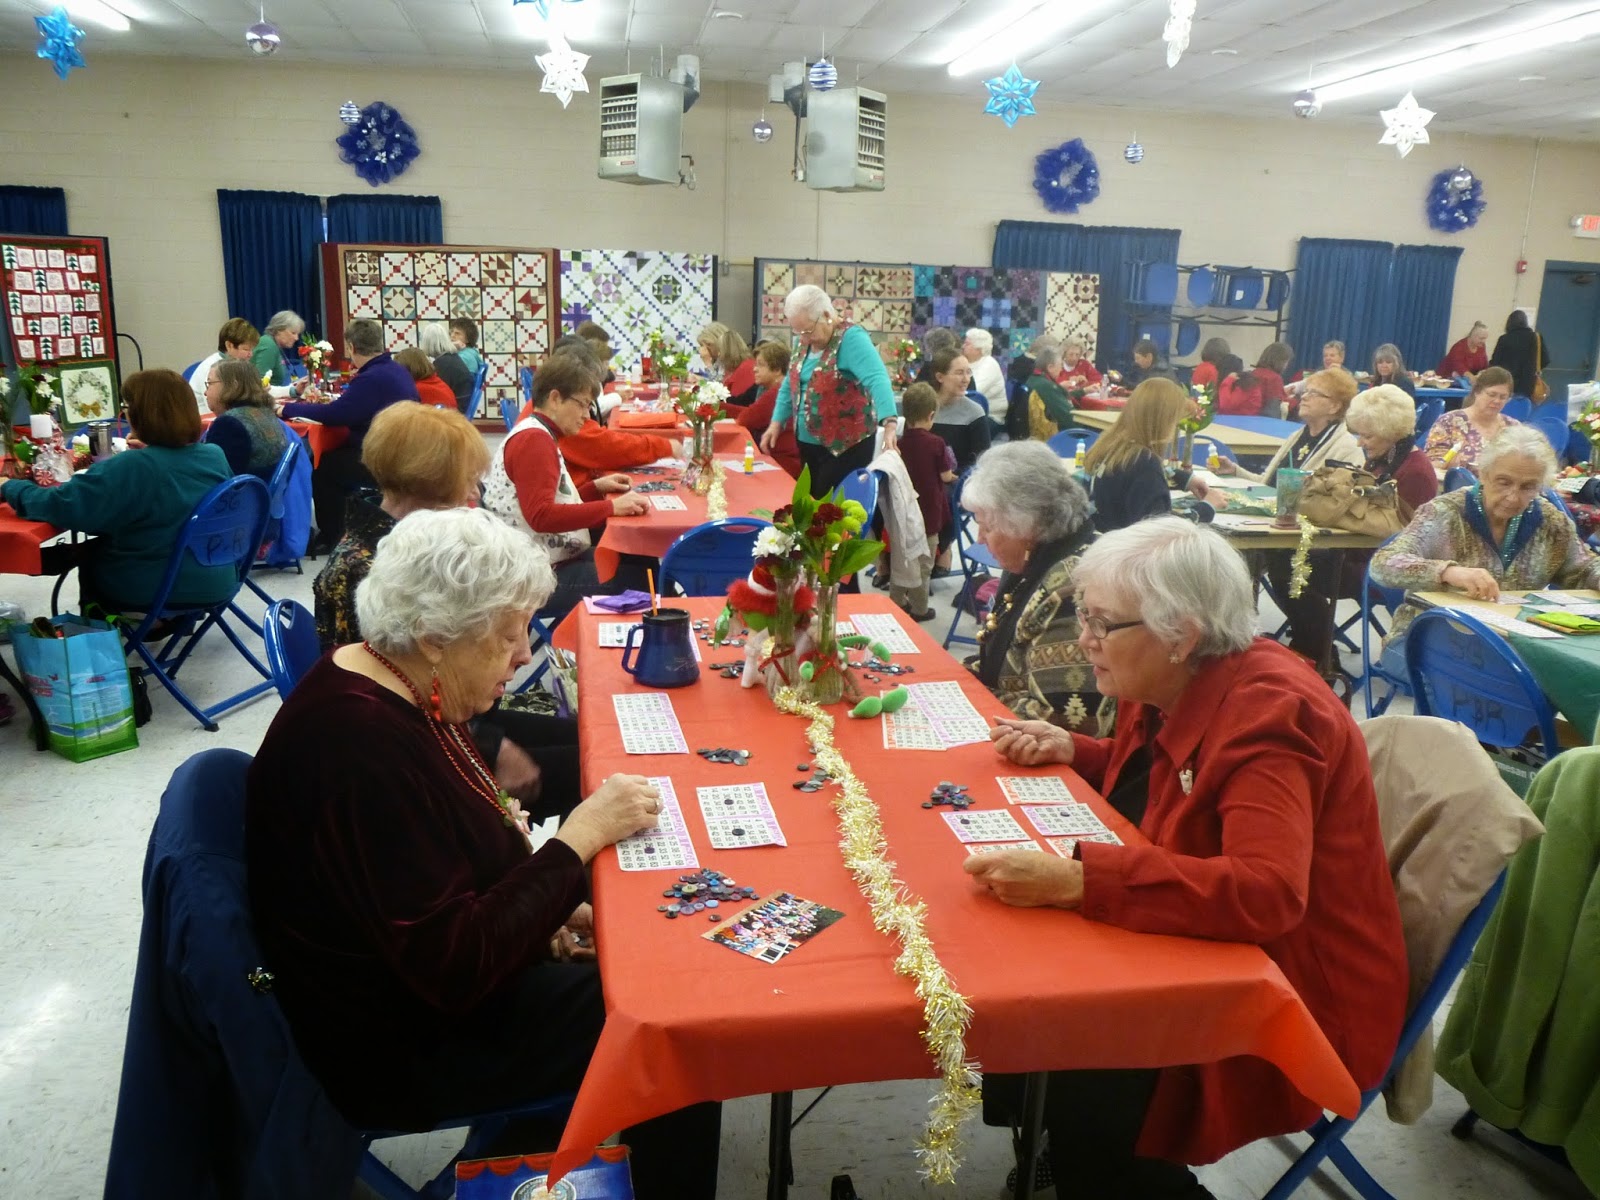


Table decorations by Wanda


and more Bingo!


Great Spread - lot of Desserts!


Lining up hungry


Donations for Storehouse West

October 16, 2014
Making Christmas Tree Skirts with 9 degree and 10 degree wedge rulers


Ardith's Class


View the Tutti Frutti quilt at https://hoffmanfabrics.com/EDocs/Site10/Flavalicious%20quilt%20pattern.pdf.


View the Go With the Flow quilt at https://hoffmanfabrics.com/EDocs/Site10/Go%20With%20The%20Flow%20quilt%20pattern.pdf.


Felted Flower

Fractured Quilt


Floating Boxes


Gnomes

Reserve an 11 1/2" x 4 1/4" rectangle of the background fabric. Cut around each unit, leaving exactly 1/4 inch beyond the outside line. Write the color you plan on making each piece in pencil on the papers. If you would like to start with the easiest unit, I recommend the smaller mushroom. Flip the papers over to the non-printed side. Cover piece #1 with the appropriate fabric, making sure it extends by at least 1/4" on all sides. The wrong side of the fabric should be touching the paper. Use a glue stick to attach the fabric piece to the paper.

Flip the paper to the front. Use your rectangular piece of template plastic to fold the paper over on the line between #1 and #2, with #1 below and #2 folding over the template.

Butt your add-a-quarter ruler against the folded edge. The thicker part of the ruler should be over the wrong side of the fabric, but not the paper. Cut off the fabric extending beyond the ruler, keeping your fingers out of the way.

Take a piece of the appropriate fabric for #2 large enough to cover the entire space plus 1/4" on a sides. From the back side, line it up with the edge you cut with your add-a-quarter ruler. The right sides of the fabrics should be facing each other. Flip the paper over to the printed side.


Make sure you have shortened your stitch length to around 1.5.

Sew on the line, extending 1/4" before and after the endpoints.

The sub-units should be constructed as shown.

Sew them together as shown. You will need to add a rectangle of the background fabric, which you reserved earlier.


Placemat

Table Runner

Tesselating Pinwheels


DRAWSTRING PURSE TAUGHT BY LINDA LITTMAN - March 15
The drawstring purse can be made in three sizes - 18", 24", 30" plus 2 - 3" strips for handles. You will need two companion fabrics for the purse.
Supplies
1. Sewing machine
2. Matching thread
3. Scissors
4. Pins
5. Seam Ripper
6. Iron - we can share
7. If you are cutting in class bring rotary cutter and mat.


Jeannie's Puppy Class - February 16


Christmas Row-by-Row Quilt - Diane Bourg


This year I will be teaching a Christmas Row-by-Row Quilt for you to finish for Christmas 2012. Each month will be a different technique, including dimensional border, embellishing, quilting, and binding. I will demonstrate at the first meeting of the month, and if you want to bring your sewing machine to work on your blocks, I will stick around to help. You don't have to use the colors I used for my quilt. I suggest picking your border fabric first, then your background color, then add the other colors used in the blocks. You will be embellishing this quilt, so start collecting "glitz and swarm!"
Overview:
Block size is 6 1/2" x 6 1/2" unfinished for most blocks.
Quilt size is 44" x 38".
Fabrics:
5/8 yard Christmas border print
background for blocks
greens for trees, wreaths and corners
dark tans for gingerbread people (five pieces approximately 6" x 6" or 1/8 yard)
red
gold for stars
white for snowmen
blue
3/8 yard binding fabric
1 1/4 yard backing fabric
crib size batting (45" x 60")
Select border fabric first, then determine background fabric color. Select greens, reds, golds, blues and binding to coordinate. Greens, red, blue and gold should be solids, mottles, or small-scale prints/batiks that read as solids. Whites and creams may be solid or tone-on-tone.
Month
|
Block
|
Technique
|
January
|
4-patch corners
|
Strip piecing, chain piecing, flat center seam
|
February
|
Gingerbread people
|
Appliqué-window raw edge or turned interfacing method
|
March
|
Snowmen
|
Yo-yo appliqué
|
April
|
Wreath
|
Piecing half square triangles
|
May
|
House
|
Paper piecing
|
June
|
Trees
|
Flying geese
|
July
|
Stars
|
Folded 3-D
|
August
|
Construction & embellishment
| |
September
|
Border
| |
October
|
Quilting and hanging sleeve
| |
November
|
Binding & labeling
| |
December
|
Enjoy!
|
January Four Patch Corners:
Block Size: 4 1/2" unfinished
Number of Blocks: 4
Materials: 1/10 yard red and 1/10 yard green
Instructions:
1. Cut 1 strip of each color 3" x 25".
2. Sew together longest side with right sides together.
3. Open & press to red.
4. Cross-cut into eight 3" wide pieces.
5. Alternating red to green, sew 2 pieces together to make 4 blocks.
6. Take out a few stitches of the first seam and press the center flat. Seams should swirl around and center should look like a miniature 4-patch.
7. Trim 4-patches to 4 1/2" square.
NOTE: If you can sew an accurate 1/4" seam, then you can cut strips 2 1/2" wide, cross-cut 2 1/2" and save yourself the trimming step.


Christmas Row by Row
July – Flying Geese Trees
Block Size: 6 ½ x 8 ½ inch unfinished
3 Blocks
Materials:
1/4 yd background
6 rectangles 6 ½ x 3 ½ assorted greens
1 ½ strip brown or black for trunks
Instructions:
- Cut 1 strip 3 ½ in. wide of background, then cross cut into 3 ½ inch squares (need 12 squares total). Cut 1 strip 3” wide, then cross cut into 2 ½ inch rectangles (need 6 total).
- Cut strip of trunk fabric into 2 ½ inch lengths (need 3).
- Draw a diagonal line on the back of each 3 ½ inch background square.
- Lay a square on the end of a rectangle. Sew on the line
- Press to background. Trim out excess. Repeat on other side of rectangle to make a flying geese.
- Sew a background rectangle to each of the long sides of the trunks.
- Sew 2 geese together, green point upward. Attach trunk section to the bottom.
- Option: Make the trunk section 4 ½ inches long instead of 2 ½ inches. Finished block will be 10 ½ inches.
Christmas Row by Row
September -- Construction
Materials:
Completed quilt blocks
Background fabrics
Borders
Corners from January
Optional:
1.5” strips for folded border
2.5” strips of two colors for checkerboard
Important hints:
- Start from the bottom and work up.
- Using a walking foot helps, especially with the borders.
Instructions:
1. If you haven’t already, trim gingerbread squares to 6.5”. Sew together and measure. This will be your “base measurement.” Mine was 30.5”. Also, don’t press yet.
2. If you are making a checkerboard, sew two 2.5” strips together, cross-cut into 2.5” and alternate. Sew together into checkerboard. I needed 15 squares in each row. Press to one side.
3. Now press gingerbread people to opposite side and sew to checkerboard.
4. Sew wreath blocks together. Press the same way you did gingerbread. Sew to checkerboard.
5. Cut some 1.5 inch strips of background and sew between houses. Cut some 2.5 inch strips and sew to ends of house row. Measure and trim to your base measurement. Sew to wreath row.
6. Alternate tree and snowman blocks. Sew together. Sew to houses.
7. Sew stars together. Sew to tree/snowman row.
8. Measure through center of the longest side. Trim side borders and side strips to this measurement. Sew to sides. Press toward border.
9. Cut top and bottom borders and strips to the base measurement. Attach the corners, making sure to catch the strips.
10. Sew on top and bottom borders.
This month’s topic in the Christmas Row by Row quilt is quilting. I stitched around all the major motifs, outlined the doors, windows and roofs of the houses. The roofs got a scallop treatment. I used templates to stitch snowflakes in the borders and elsewhere on the quilt. In the checkerboard, I used a continuous quilting technique that I will talk about at the meeting.
To make the “no hand stitching” hanging sleeve, measure the width of your border (I think mine was 6 inches). Cut the length of your sleeve to the width of your quilt, less a couple of inches. Cut the width twice the width of the border, plus a couple of inches. Hem the short edges by folding down 1/4” twice and top stitching. Fold the sleeve lengthwise, WRONG sides together and make a 1/4” seam. Press open. Set aside until it’s time to do the binding.
November-Finishing Touches
It’s time to finish your quilt!
Step 2 Make a label for your quilt
For your label, you can use a plain, light-colored fabric that reads solid (you want to see the letters). At a minimum, your label should contain:
· Your name
· The year of completion
· The place of completion
But it’s nice if you name your quilt, and put details such as who it’s being given to (if a gift), the occasion, who did the quilting (if not you), etc.
There are labels that you can purchase from your fabric store. There are label designs that can be ironed-on. You can write the details with a fabric pen (Caution! Most Sharpies run when washed!). You can embroider the label by hand or machine if you wish (Caution! Rayon thread may not be colorfast! Consider polyester machine embroidery thread).
Leave room around the edges for hemming, turning under, etc. If you plan to hem your label by machine, do it now.
Step 2 Make the binding
See the separate document “Continuous Binding.” Do Steps 1 and 2. Standard binding width is 2 ¼ inches. Don’t attach it yet!
Step 3 Prepare quilt for binding
Put your walking foot on your sewing machine. Trim and square up your quilt. If you want to baste or serge the edges, do this now.
Step 4 Hints
Take the hanging sleeve and place it seam side down on the back of your quilt. Center it, and align the top with the top edge of the quilt. The bottom edge of the sleeve should just hang over where the border is on the other side. Pin the sleeve to the quilt from the right side. Sew in the ditch between the body of the quilt and the border to secure the sleeve.
If you are installing the label in the corner, you can put the raw edges of the label into the corner and pin from the front.
If you want to, you can machine baste the label and the sleeve from the back first.
Step 5 Attach the binding and finish
Attach the binding. See “Continuous Binding,” Steps 3-6.
Traditionally, you sew the binding to the front of the quilt, bring it to the back and hand stitch. You can also stitch to the back of the quilt, bring it around to the front and machine stitch to the front, using either a straight stitch or a decorative stitch.
Slip-stitch the label to the back by hand.
Continuous Binding
Step 1 – Decide on your Width of Binding (WoB).
This will depend on the size of your quilt and the effect you want. Common widths are 2 ¼” and 2 ½” but you can make your binding narrower for a mini quilt or wider for a large or flannel quilt.
Step 2 – Make the binding.
Cut strips WoF; you will need at least 12” extra in length. Do not trim selvages. Take two strips, put them right sides together at 90° with the selvages hanging off the edges (Figure 1). Mark the diagonal and sew. Trim seam to scant ¼” and press OPEN (Figure 2). Continue until one long strip of binding is made. Press in half lengthwise, wrong sides together. Do NOT trim the tails of your binding.
Step 3 – Sew the binding to one side of your quilt.
Start on one side of your quilt, 1 foot or more from the corner. Do a dry layout to avoid having the binding seams fall at the corners of your quilt. Leaving a 6” to 8” tail at the beginning, sew the binding to one side of your quilt. Miter corners (this will be a separate How To). When you get near the end, leave a 12” opening (Figure 3). A walking foot is helpful for sewing binding to the quilt.
Step 4 – Trim the ends of your binding.
Trim the selvage off one end by cutting straight across (i.e. NOT on the diagonal). Overlap the ends and mark a WoB overlap. Cut the second end straight across at the mark (Figure 4).
Step 5 – Sew the ends together.
With the quilt towards you, unfold the binding and pull the ends to 90°, right sides together, with the end to your right on TOP (Figure 5). Leave a scant 1/4” hanging off the edges. Mark the diagonal, sew, seam to scant ¼” and press seam OPEN (a wooden iron is handy for this step).
Step 6 – Finish.
Re-fold the binding. It should just fit along the quilt. Sew. Fold binding over the edge of your quilt and sew by hand or machine.


No comments:
Post a Comment
Please feel free to make a comment and I will respond back to you via email unless you are a no-reply and then I will respond here on the blog, so check back.